Managing Scripts
In this chapter you'll learn about managing scripts in the Jenova ecosystem.
Script Management
Script Management is a simple yet important part of programming pipeline. Let's dive into different aspects of managing your C++ Scripts.
Creation/Attachment
Using File System
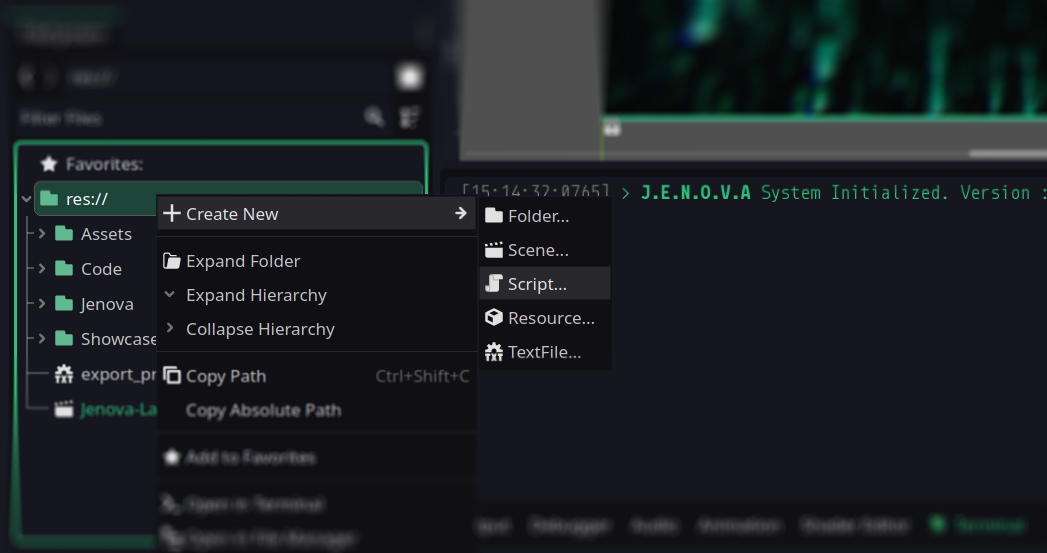
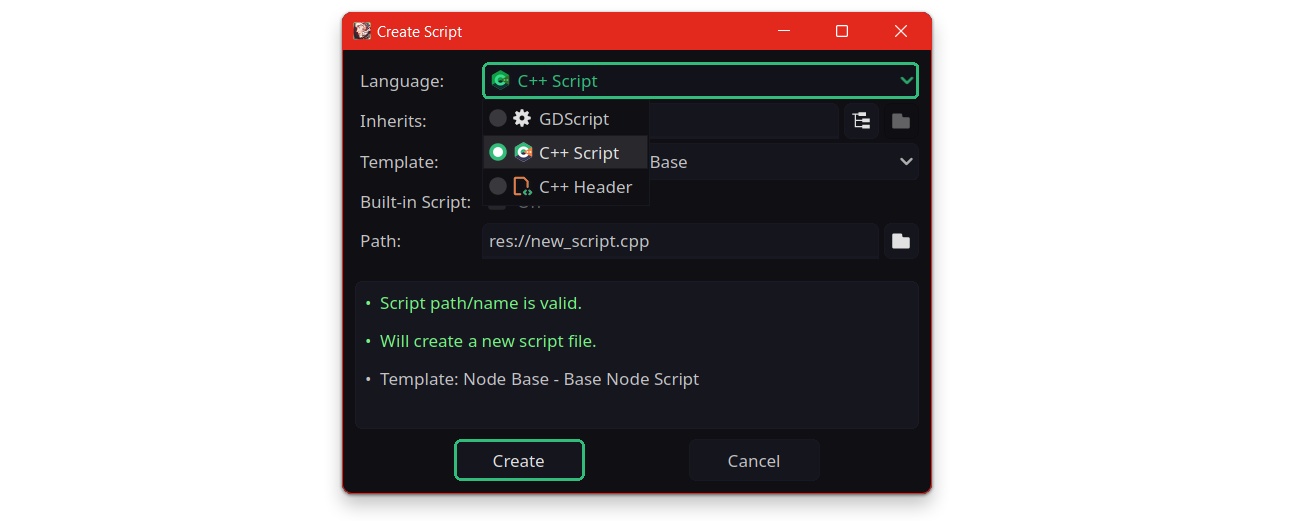
To Create a new C++ Script using file system, Simply right-click inside FileSystem and pick ![]() Create New >
Create New > ![]() Script... to open Create Script window, Select C++ Script from Language list and click on Create button.
Script... to open Create Script window, Select C++ Script from Language list and click on Create button.
Using Inspector
To Create a new C++ Script using inspector, Select a node, Head to the Script value at bottom of inspector panel, Click on the arrow beside script slot and select ![]() New Script... to open Create Script window, Select C++ Script from Language list and click on Create button.
New Script... to open Create Script window, Select C++ Script from Language list and click on Create button.
Using Scene Tree
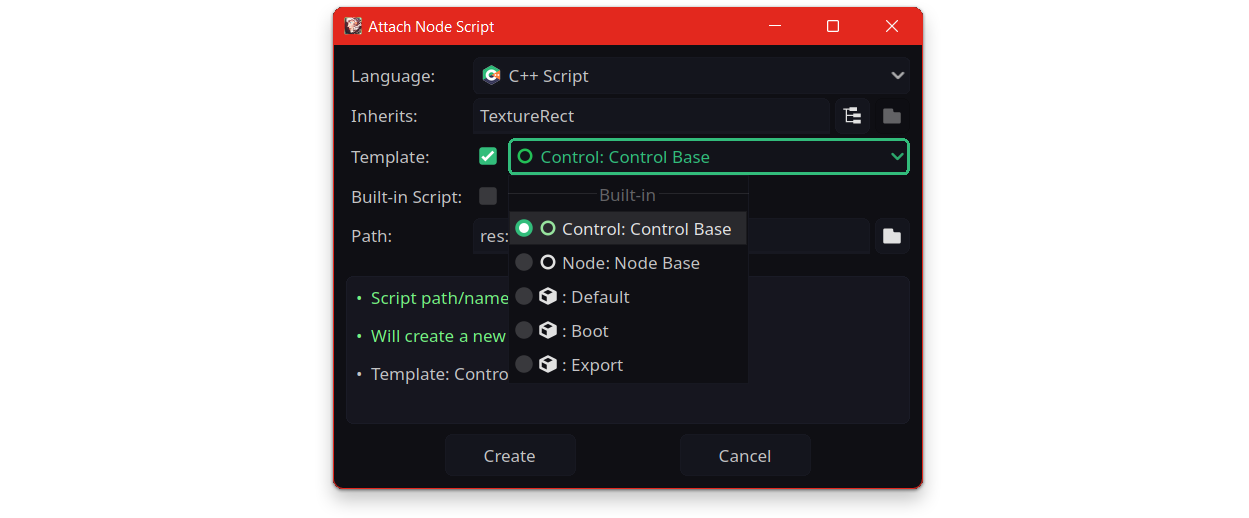
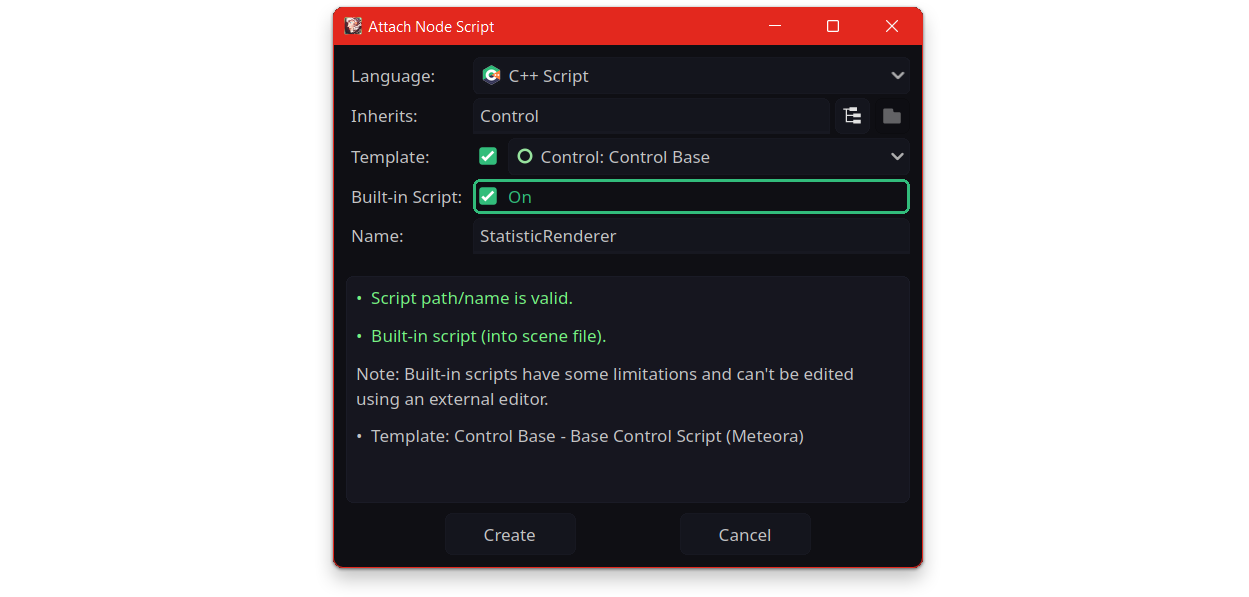
To Create a new C++ script using scene hierarchy, Right-click on a node and then select ![]() Attach Script to open Attach Node Script window, Select C++ Script from Language list and click on Create button.
Attach Script to open Attach Node Script window, Select C++ Script from Language list and click on Create button.
Assignment
To assign a C++ Script to a node simply drag and drop it from FileSystem over your node in SceneTree or script slot in Inspector.
Templates
Jenova provides support for Script Templates based on the node class type. Templates are very useful to reduce the time for repeated code structures, Script Templates will be accessible from the engine's native Create Script window.
Script Template System also provides script templates tailored to the selected interpreter backend. For example, if you're using the NitroJIT backend script templates will adapt to ensure compatibility with NitroJIT. Similarly, if you're using the Meteora backend script templates will adapt to be compatible with Meteora. Additionally, script templates can be universal ensuring compatibility with all backends.
You can create your own templates by placing them at res://Jenova/Templates with proper format and new templates can be installed from the Package Manager, To add a new template place the C++ file inside related directory and create a .json file with same name as script.
Here's how script metadata looks like :
{
  "Category":     "Inherited",
  "Backend":      "Meteora",
  "Inherit":      "Node",
  "Name":         "Node Base",
  "Description":  "Base Node Script (Meteora)",
  "Author":       "Hamid.Memar",
  "Version":      1.0
}
The Template System provides macros to automatically inject dynamic data into the assigned script template :
-
Base Class Macro (
$BASE_TYPE$)
Replaced with the class type the script is assigned to such asNode3D,RigidBody3D,Sprite2Detc. -
Base Class Header Macro (
$BASE_TYPE_HEADER$)
Replaced with the header file name based on the assigned class type such asnode3d.hpp,rigid_body3d.hpp,sprite2d.hppetc. -
Base Class Name Macro (
$BASE_CLASS_NAME$)
Replaced with a generated class name based on the script file name. It's useful for Nested Extension templates.
Operations
You can rename or move C++ Scripts at anytime, But remember, By changing name of a script or moving it unique identifier of your script will change and you need to clean solution and rebuild it again, Also If you're using External editors such as Visual Studio, You will need to re-export your project.
Do not modify the codebase directly from Visual Studio. This includes adding, renaming, or deleting C++, header, resource and project files in a generated Visual Studio solution. Instead, apply changes in Godot and re-export the project.
Built-in Scripts
Jenova supports built-in scripts similar to GDScript, Allowing you to embed C++ scripts directly inside Nodes without relying on the filesystem.
To create a built-in script simply right-click on a Node in scene tree and then select ![]() Attach Script to open Attach Node Script window, Check Built-in Script and click on Create button.
Attach Script to open Attach Node Script window, Check Built-in Script and click on Create button.
As of release 0.3.9.1+, Built-in scripts have been deprecated due to no tangible benefits.
While the functionality is still available in the source code, it is disabled by default for better maintenance.
Script Types
Jenova C++ Scripts can be used in different ways. Here are the different types currently available in the ecosystem.
Active Scripts
Active Scripts are C++ scripts assigned to a Node in an active scene. These scripts contain a C++ Script Instance and can expose Properties, Resources, References and Documentation to the engine. They are useful for programming game logic and exposing events.
Tool Scripts are also active scripts.
Passive Scripts
Passive Scripts are C++ scripts not assigned to any Node nor active in any scene. They are useful for creating Nested Extensions, External Functions, Utilities, and Exporting Functions for third-party libraries.
Header Scripts are also passive scripts.
Hybrid Scripts
Hybrid Scripts are C++ scripts using both active and passive context, Learn more about Hybrid Scripts Here.
Script Metadata
The Script Metadata feature allows you to personalize your Jenova C++ Scripts by attaching custom icons and documentation for improved organization and visual clarity. Whether you're sharing scripts with others or developing tool scripts, this feature proves especially useful.
Script Icon
To associate a custom icon with your script, follow these steps :
- Create an .svg file named exactly as your script file (excluding extension)
- Place the icon file in the same directory as your script file.
Example:
If your script is located at : res://Scripts/Tools/MeshFixer.cpp
Then your icon should be named and placed as :res://Scripts/MeshFixer.svg
💡Tip : If the icon does not immediately appear, try clearing the project cache to apply updates correctly.
Script Documentation
To add documentation to your script file and make it accessible within the engine editor's help system:
- Create an .xml file following the same format used by engine documentation files.
- Name the file exactly the same as your script (excluding extension)
- Place the documentation file in the same directory as your script file.
Example:
If your script is located at : res://Scripts/MeshFixer.cpp
Then your documentation should be named and placed as :res://Scripts/MeshFixer.xml
<?xml version="1.0" encoding="UTF-8"?>
<class name="MeshFixer" inherits="EditorPlugin"
       xmlns:xsi="http://www.w3.org/2001/XMLSchema-instance" xsi:noNamespaceSchemaLocation="../class.xsd">
  <brief_description>
      An editor tool to fix broken mesh data in selected MeshInstances.
  </brief_description>
  <description>
      This tool detects and repairs invalid mesh surfaces, restoring usable geometry for selected MeshInstances.
  </description>
	<tutorials>
		<link title="Learn More">https://godottools.com/tutorials/mesh-fixer</link>
	</tutorials>
	<members>
		<member name="FixInvalidNormals" type="bool" default="true">
			When set to [code]true[/code] tool fixes invalid normal indices.
		</member>
	</members>
	<methods>
		<method name="FixMesh">
			<return type="void" />
			<param index="0" name="instance" type="Object" />
			<description>
				Fixes [code]MeshInstance3D[/code] mesh data.
			</description>
		</method>
	</methods>
</class>
💡Tip : If documentation doesn’t appear immediately, Use Jenova > Tools >
Reload Script Documentation to refresh the index.
Script Manager
Script Manager is a tool for displaying structured details of all C++ scripts in the project.
The information includes Script Unique ID, Script Type, Script Function/Properties count and Sentinel profiling data.
Script Manager can be accessed from the menu Jenova > Tools > ![]() Open Script Manager...
Open Script Manager...
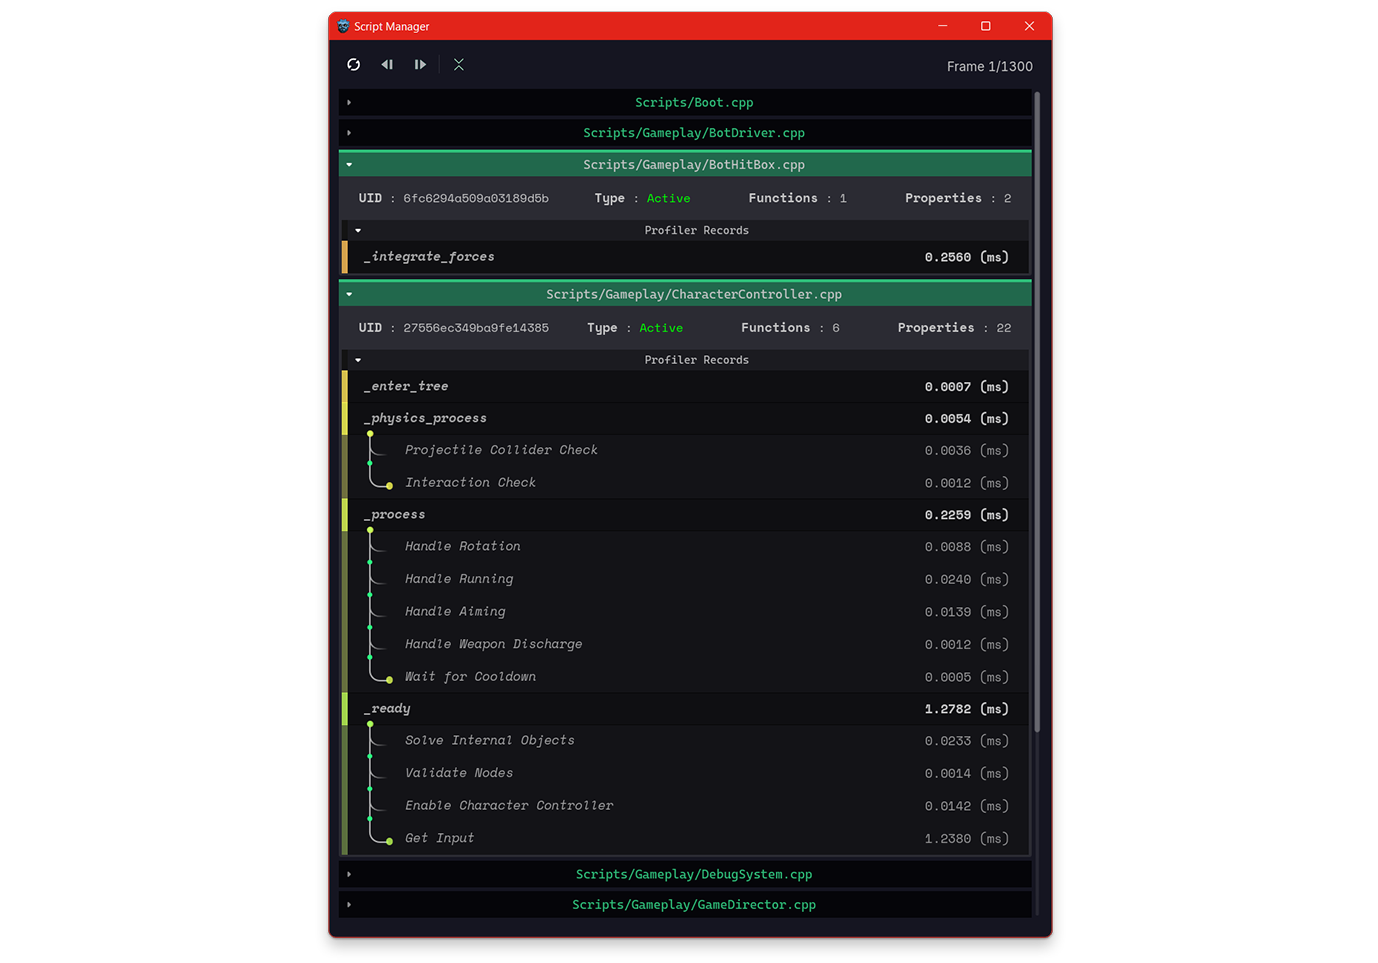
- Unique ID (UID) : The unique identifier of the script, used by the compiler and interpreter.
- Type : The script type detected based on its content and behavior.
It can be Passive, Active, Hybrid or Extension. - Functions : Displays the number of functions defined and parsed by the interpreter.
- Properties : Displays the number of properties defined and parsed by the interpreter.
- Profiler Records : Displays profiling records loaded from the Sentinel cached database.